nmap脚本nmap-vulenrs和vulscan脚本NSE搜索漏洞cve的检测用法

安装Nmap-vulenrs
首先我们先cd到nmap的脚本目录
cd /usr/share/nmap/scripts/
然后克隆nmap-vulners github存储库
git clone https://github.com/vulnersCom/nmap-vulners.git
安装Vulscan
安装vulsan,我们还需将Vulscan的存储库克隆到nmap的脚本目录中
git clone https://github.com/scipag/vulscan.git
vulscan使用本地存储在我们计算机上的预配置数据库。我们可以在vulscan目录的根目录中查看这些数据库。运行以下ls命令列出可用的数据库。
使用nmap-Vulners进行扫描
使用NSE脚本很简单。我们所要做的就是将–script参数添加到我们的Nmap命令中,并告诉Nmap使用哪个NSE脚本。要使用nmap-vulners脚本,我们将使用以下命令。
nmap --script nmap-vulners -sV -p port ip |
该-sV是绝对必要的。使用-sV,我们告诉Nmap探测版本信息的目标地址。如果Nmap不生成版本信息,则nmap-vulners将没有任何数据来查询Vulners数据库。使用这些NSE脚本时始终使用-sV。
nmap --script nmap-vulners -sV -p80 ###.###.###.### |
下面是一个示例
nmap --script vulscan --script-args vulscandb=exploitdb.csv -sV -p22 172.23.211.97 |
合并使用
作为安全扫描程序,NSE脚本显着提高了Nmap的多功能性,为了充分利用Nmap的版本扫描,我们可以在一个命令中同时使用nmap-vulners和vulscan。
nmap --script nmap-vulners,vulscan --script-args vulscandb=scipvuldb.csv -sV -p# ###.###.###.### |
Nmap vulscan
Vulscan queries its own local CVE databases, hosted on the client performing the scan. These local databases include the following files: scipvuldb.csv, cve.csv, securityfocus.csv, xforce.csv, expliotdb.csv, openvas.csv, securitytracker.csv, osvdb.csv.
In order to use this NSE script, we’ll need to clone its github repo, in almost the same way we did before.
Installation
The following commands will install the vulscan script along with all the databases mentioned:
git clone https://github.com/scipag/vulscan scipag_vulscan然后软连接ln -s pwd/scipag_vulscan /usr/share/nmap/scripts/vulscanNow let’s perform an Nmap vulnerability scan with vulscan, by using the following syntax:
nmap -sV --script=vulscan/vulscan.nse www.example.comThe expected output will show you something like this:
[[email protected] ~]# nmap -sV --script=vulscan/vulscan.nse 192.168.1.105Starting Nmap 7.70 ( https://nmap.org ) at 2019-10-24 11:24 -03Nmap scan report for 192.168.1.105 (192.168.1.105)
Host is up (0.000061s latency).
Not shown: 999 closed ports
PORT STATE SERVICE VERSION53/tcp open domain dnsmasq 2.80| vulscan: VulDB - https://vuldb.com:
| [49778] Thekelleys dnsmasq up to 2.32 tftp.c tftp_request memory corruption
| [43410] The Kelleys dnsmasq 2.43 Crash denial of service
| [43287] Thekelleys dnsmasq 2.25 Crash denial of service
| MITRE CVE - https://cve.mitre.org:
| [CVE-2013-0198] Dnsmasq before 2.66test2, when used with certain libvirt configurations, replies to queries from prohibited interfaces, which allows remote attackers to cause a denial of service (traffic amplification) via spoofed TCP based DNS queries. NOTE: this vulnerability exists because of an incomplete fix for CVE-2012-3411.| [CVE-2012-3411] Dnsmasq before 2.63test1, when used with certain libvirt configurations, replies to requests from prohibited interfaces, which allows remote attackers to cause a denial of service (traffic amplification) via a spoofed DNS query.
| [CVE-2009-2958] The tftp_request function in tftp.c in dnsmasq before 2.50, when --enable-tftp is used, allows remote attackers to cause a denial of service (NULL pointer dereference and daemon crash) via a TFTP read (aka RRQ) request with a malformed blksize option.
| SecurityFocus - https://www.securityfocus.com/bid/:
| [31017] Dnsmasq DCHP Lease Multiple Remote Denial Of Service Vulnerabilities
| [17662] DNSmasq Broadcast Reply Denial Of Service Vulnerability
| [12897] Dnsmasq Multiple Remote Vulnerabilities
Nmap done: 1 IP address (1 host up) scanned in 11.25 seconds
[[email protected] ~]#
Tip: you can also use your own CVE local database by using the vulscandb argument:
--script-args vulscandb=your_own_databaseNmap-vulners
Nmap-vulners is one of the most famous vulnerability scanners in use. Let’s explore how to install this tool, as well as how to perform a simple CVE scan.
Installation
Copy and paste the following two lines to install the nmap-vulners:
cd /usr/share/nmap/scripts/ 然后再克隆
git clone https://github.com/vulnersCom/nmap-vulners.git
Testing
The syntax we’ll be using is pretty simple, calling the script by using –script and specifying the vulners engine, as shown here:
nmap --script nmap-vulners -sV 11.22.33.44If you want to target specific posts, you simply need to add -p80 at the end, and replace “80” with the port you want to scan. And of course, replace 11.22.33.44 with your desired IP.
You can also target by host name. For example:
nmap --script nmap-vulners -sV www.securitytrails.comThe -sV parameters will allow Nmap to show you version information from the vulnerable services on the remote host.Nmap-vulners queries the Vulners exploit database every time we use the NSE script. And here’s the expected output:
[[email protected] ~]# nmap --script nmap-vulners -sV 192.168.1.105 -p 21-80Starting Nmap 7.70 ( https://nmap.org ) at 2019-10-25 10:41 -03Nmap scan report for 192.168.1.105Host is up (0.34s latency).
Not shown: 55 closed ports
PORT STATE
21/tcp open ftp ProFTPD 1.3.3e
22/tcp open ssh OpenSSH 5.3p1 Debian 3 ubuntu7.1 (Ubuntu Linux; protocol 2.0)
| vulners:
| cpe:/a:openbsd:openssh:5.3p1:
| CVE-2016-10708 5.0 https://vulners.com/cve/CVE-2016-10708 8| CVE-2017-15906 5.0 https://vulners.com/cve/CVE-2017-15906| CVE-2018-15473 5.0 https://vulners.com/cve/CVE-2018-15473|_ CVE-2016-0777 4.0 https://vulners.com/cve/CVE-2016-077725/tcp open smtp Postfix smtpd
53/tcp open domain ISC BIND DNS
| vulners:
| ISC BIND DNS:
| CVE-2012-1667 8.5 https://vulners.com/cve/CVE-2012-1667| CVE-2002-0651 7.5 https://vulners.com/cve/CVE-2002-0651| CVE-2002-0029 7.5 https://vulners.com/cve/CVE-2002-002980/tcp open http nginx 1.4.1
|_http-server-header: nginx/1.4.1
As you can see, we were able to discover several CVEs easily, including SSH and BIND vulnerabilities.
Tip: Another way to run these scripts is by combining both of them into one single command, as shown below:
nmap --script nmap-vulners,vulscan -sV yourwebsite.comNmap vuln
The way NSE scripts are defined is based on a list of predefined categories where each script belongs. These categories include: auth, broadcast, brute, default, discovery, dos, exploit, external, fuzzer, intrusive, malware, safe, version, and vuln.
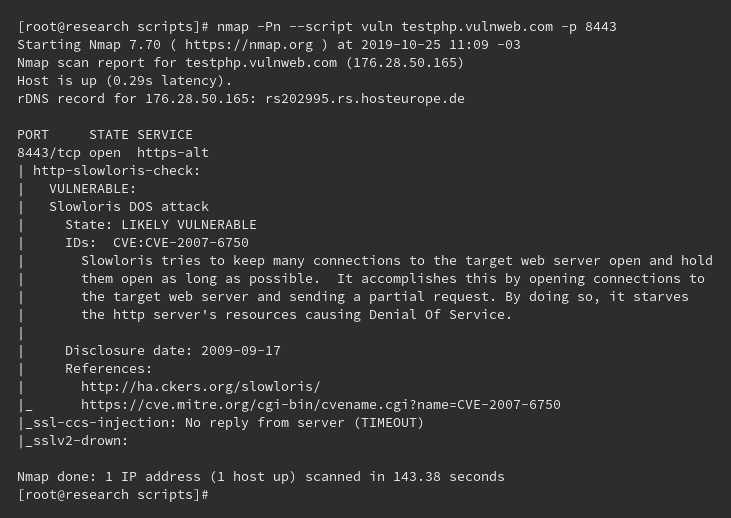
Vuln is the one we’ll be using to launch our next scan against vulnerable subdomains. The syntax is the same as that of the previous NSE scripts, with ‘vuln’ added after ‘–script’, as you can see here:
nmap -Pn --script vuln 192.168.1.105Expected output:

Here, we launched a CVE scan against port 8443, but you can query other ports, or the entire site as well.
Summary
Nmap’s powerful scripts allow you to not only perform port scanning tasks, but also to discover CVEs in a matter of seconds. Thanks to Nmap, this becomes an easy task, even if you don’t have advanced technical skills.

 admin
admin